Unthink: Starting to move beyond the constraints of relational databases

Previous Post:Unthink: Moving Beyond the Constraints of Relational Databases
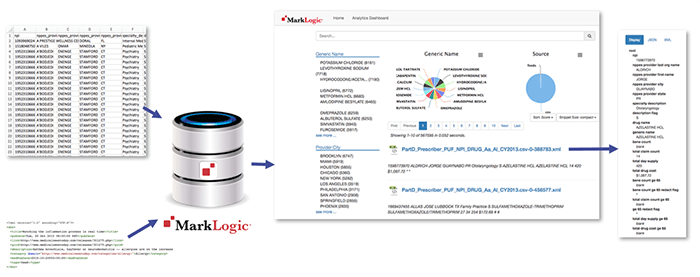
Welcome to Part 2 of the 0 to 100 series (with inspiration from Drake), a continuation of a previous post from the MarkLogic.com blog where I outlined some of the high-level items that plague organizations with respect to integrating their data from silos. Here, we will dive head-first into working with an Angular JS application as the frontend and scaffolding while loading disparate data sets into MarkLogic so we can see first-hand how it makes integrating data from silos incredibly easy.
Getting Up and Running with MarkLogic
What would a tech how-to blog post be without some initial setup? To follow along with this blog post and avoid configuration steps, it is best if your Administrator username/password is admin/admin, the default ports (8040 and 8041) are available, and you are running MarkLogic locally. In a future post, we will cover how to tweak these.
Skip Steps 1 and 2 if you already have MarkLogic up and running.
- Follow the appropriate installation process for your Operating System and start MarkLogic server.
- Configure your host – this takes only a minute! Compare that time to other setups, haha.
- Make sure you are able to login to the MarkLogic Administrator Console (usually found at http://localhost:8001/) using the admin credentials.
Script the Database, Forest, and Application Server
We could manually create a database, forest and application server to hold and serve up our data but that’s a lot of work and effort although I invite you to review and understand those concepts. Nevertheless, I also enjoy being lazy especially when it makes things easier and more manageable so we’ll use a MarkLogic tool (Roxy) that makes this configuration a breeze over REST and easier to follow along.
We’re going to surface the data using the newly released and frequently updated ml-slush-discovery-app (Slush Discovery) template from one of my colleagues Ryan Dew. As the name may imply, it is based on the slush-marklogic-node template/generator. What is that? Slush is an app project generator that provides scaffolding for a quick JavaScript-based app on top of MarkLogic. The Slush generator was built with AngularJS and node.js and you can fully customize your project once its been generated. That’s right, full stack JavaScript! I introduce the app for surfacing the data because it also ships with Roxy, which makes configuring the database, forest, and application server a snap! It does get tedious after you’ve done it manually sometimes which makes scripting it out in Roxy so much fun. ;)
Getting going with Slush Discovery
Make sure to check for and install the key dependencies you don’t already have. You’ll need to enable root on OS X if you have not done so already.
- Ruby 1.9.3 or greater – A dynamic, reflective, object-oriented, general-purpose programming language
- Java (jdk) – Only if you wish to run the mlcp, XQSync, or RecordLoader commands
- node.js – JavaScript runtime using an event-driven, non-blocking I/O model that makes it lightweight and efficient
We will use Git to pull down the latest ml-slush-discovery-app master branch (aka the latest production release) in a few steps. Git is incredibly handy for SCM (Software Configuration Management) and of course pulling down public projects from GitHub. If you do not have git:
Windows Users: Download and install Git for Windows. Specifically, Git Bash (Git + Shell Interface) will make your life easier in running the commands that follow as the Windows Command Prompt would require all sorts of Path variables which are no fun to troubleshoot.
Mac OS X Users: Download and install git if you do not have it already.
Additional dependencies/requirements to install via terminal prompt (or Git Bash for Windows):
- npm – Built-in package manager for node (comes with node, but check to be sure you have latest version)
$ npm install -g npm
- gulp – Javascript task automation
$ npm install -g gulp
- Bower – A package manager for front-end libraries
$ npm install -g bower
- MLCP – Binary for loading/exporting data. Extract the ZIP somewhere reusable- perhaps in the directory above where the Slush Application will live (../).
Officially, Slush requires a few additional Windows dependencies although I’ve had no issue proceeding without them many times over.
Change directories in your terminal prompt (or Git Bash for Windows) to where you would like the ml-slush-discovery-app folder with our activities to exist and issue the following to clone it:
$ git clone https://github.com/ryanjdew/ml-slush-discovery-app.git
Change directory to the ml-slush-discovery-app folder. I will assume you are in this root directory path going forward.
Update the Roxy MLCP Path and Deploy
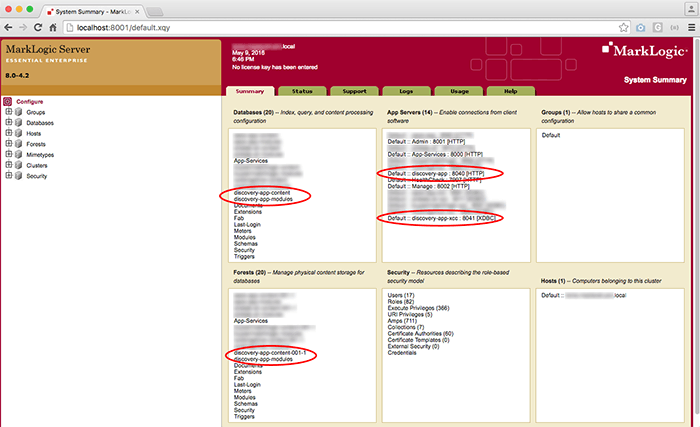
We’ll start by modifying the Roxy MLCP path in the Slush Discovery app so that we can use it to load content into MarkLogic. “Out of the box,” the Slush Discovery app requires ports 8040 for the application server port which Node.js will use to interface with MarkLogic while 8041 is used for an xcc server allowing code deployment to MarkLogic. We’ll cover how to modify those in a future post and will hope those are not in use for you until then!
Update the deploy/build.properties file which is part of the Roxy configuration to change line 170 so it points to the MLCP root directory you extracted previously.
mlcp-home=/<absolute path to MLCP>/mlcp-8.0-5
Deploy the configurations to MarkLogic using the following Roxy commands from the ml-slush-discovery-app directory.
NOTE: Windows users will use Git Bash instead of the Windows command prompt and ml.bat instead of ml.
$ ./ml local bootstrap
$ ./ml local deploy modules
You can then access the admin interface to ensure the database and app servers were created as configured.
A Quick Node.js and Angular Configuration
Now that our MarkLogic is configured with databases, forests, and application servers, we’re ready to install the app and its required dependencies with the following commands in the terminal or Git Bash for Windows users:
$ npm install
$ bower install
Cool… But we have no data yet!
Good point… For this article, one of the publicly-available Medicare Part D Provider Utilization and Payment Data Detailed Data Sets will be covered: any link on that page beginning with Part D Prescriber PUF, CY2013 will allow you to follow along with ease. The more adventurous may want to use their own data in CSV format (highly encouraged!). Even though we are working with different data sets, these steps should be helpful along the way!
Open the downloaded XLS in Excel and save it as a CSV for easy import into MarkLogic. xlsx2csv or another conversion tool could also be used. This conversion is not a requirement since MarkLogic could ingest the data as is and convert it for us but we’ll save that topic for a future blog post.
There are many empty row entries in the CSV. They may be removed with the perl command below (thanks, Editor!).
perl -i -ne 'if (!/,,,,,/) { print; }' PartD_Prescriber_PUF_NPI_DRUG_Aa_Al_CY2013.csvIf you are not familiar with perl, don’t have it, or prefer another option, open the CSV in your favorite text editor, find line 564,447 and remove the empty entries below, and save it.
Once finished, place the CSV into the /data directory.
Create a /import-medicare-data.options file (change medicare in the filename to whatever best describes your data set) with the following configuration, which MLCP (MarkLogic Content Pump) will leverage to bring data into MarkLogic. Make sure there is a space at the end of the flags (-input_file_type) before the values (delimited_text) on the new lines. Of course, make sure to change the input_file_path value so it points to the CSV you would like to import into MarkLogic. (See MLCP Options File format.)
import
-input_file_path
<path to your ml-slush-discovery-app parent directory>/cookingshow/data/<CSV file name>
-input_file_type
delimited_text
-output_uri_suffix
.xml
-output_collections
csv
-generate_uri
true
What does this mean? We’ve specified that we are importing data (MLCP can be used for export purposes as well), path to the CSV data (claims_dump.csv) we would like to import, what type of file it is, resulting URI suffix or “.xml”, placing it into the “csv” collection and that we would like to automatically generate a URI (Universal Resource Identifier or primary key).
From the command line in the root directory, we can then run the following MLCP call and use our previous configuration:
./ml local mlcp -options_file import-medicare-data.options
For the impatient or curious, opening Query Console (usually found at http://localhost:8000/), selecting the discovery-app-content Database as the Content Source, hitting the Explore button, and selecting a document is a way to see the loaded content. Back to the command window…
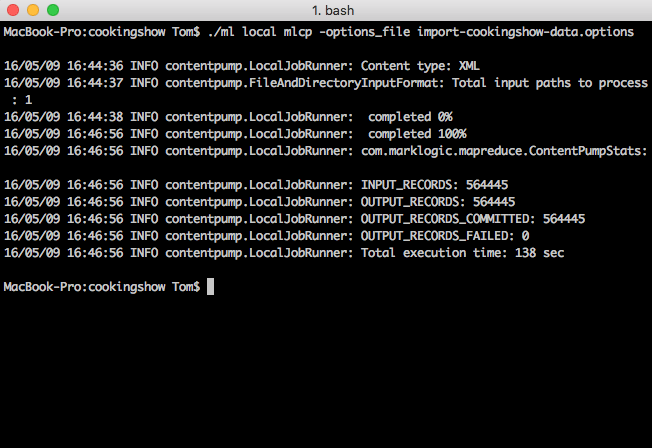
Looks like it did or is doing something. But what? In my case, it loaded 564,445 records into MarkLogic from the CSV in a few minutes (on my laptop). Cool!
Extra Credit: But what about those Twitter and blog data sets?
NOTE: This step is not required to continue, but you will not have the experience of searching two completely different data sets at the same time or seeing a pie chart depicting it. :)
No problem! We can use an xQuery script in Query Console written by my highly esteemed colleague Pete Aven that leverages MarkLogic’s xdmp:http-get function. It will retrieve multiple RSS feeds related to medicine, which we can co-mingle with the Medical Insurance Claims Data we just loaded in.
Download the Load Feeds Query Console Script and copy its contents into your open Query Console window from earlier. These 30 lines of code will grab the data from the RSS feeds and includes a function to cleanup the dates. We’ll cover this code in more detail in future post.
Download the XML document of RSS feeds into your Slush Discovery root directory. Update line 13 in Query Console so it points to this location.
If you wanted to create your own version of feeds.xml, create a document by the same name where the value of each feed element is a URL you would like to pull RSS data from. In the case below, I have provided an example of what your feed file would look like if you wanted to crawl all of the Wall Street Journal’s RSS feeds. Of course, you would need to adjust the code below to work with the structure of those RSS feeds as not all RSS feed structures are created the same.
<feeds>
  <feed>http://www.wsj.com/xml/rss/3_7085.xml</feed>
  <feed>http://www.wsj.com/xml/rss/3_7014.xml</feed>
  <feed>http://www.wsj.com/xml/rss/3_7031.xml</feed>
  <feed>http://www.wsj.com/xml/rss/3_7455.xml</feed>
  <feed>http://www.wsj.com/xml/rss/3_7201.xml</feed>
</feeds>
If you want to use the WSJ feeds, update line 25 of the code to account for the difference in element names between the feeds:
let $modPubDate := element pubDate {$dateTime}Run the code in Query Console. Once it runs successfully, select the Explore button and then one of the URIs beginning with /article-feed/ to see the results of bringing in the external blog data (one of the documents from medicannewstoday.com RSS feeds is shown below):
<?xml version="1.0" encoding="UTF-8"?>
<doc>
  <title>Watching the inflammation process in real time</title>
  <pubDate>Tue, 20 Oct 2015 08:00:00 PST</pubDate>
  <link>http://www.medicalnewstoday.com/releases/301275.php</link>
  <guid>http://www.medicalnewstoday.com/releases/301275.php</guid>
  <description>Asthma bronchiale, hayfever or neurodermatitis -- allergies are on the increase in Western European industrial countries.</description>
  <category domain="http://www.medicalnewstoday.com/categories/allergy/">Allergy</category>
  <modPubDate>2015-10-20T00:00:00</modPubDate>
  <type>feed</type>
</doc>
How do we see what we loaded into MarkLogic aside from Query Console? Glad you asked! We’ll use the Slush Discovery App to see this after a quick detour to understand Range Indexes.
A Quick Word about Range Indexes
Maybe we want to be able to run value-based (dates, integers, etc) queries against data sitting in our XML documents. Said a different way: maybe I want to quickly search for items that fall between values just like when I am shopping for TVs on Amazon.com and want to filter down on the ones that are 70″ and larger while showing the user how many results match that “bucket.” In MarkLogic, we create Range Indexes to handle this and its really easy if not trivial. We can also create unlimited facets or ranges of buckets to accomplish the “show me all TVs over 70” usecase.
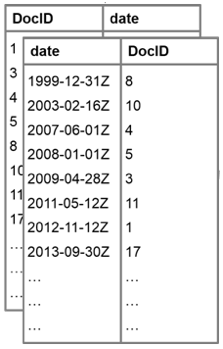
Range Indexes map values to documents and vice versa. Why?
- Value to Document provides: fast look up and intersection of doc-id from multiple predicates.
- Document to Value alleviates any need to load the document to get a value from it for speed.
Because these indexes are in-memory, MarkLogic can return documents that fall between given values, counts on them or calculations related to them, and intersections with other indexes quite quickly without going to disk. Super fast! Range Indexes may be configured in the browser-based MarkLogic Administration Console or via API. This configuration is practically trivial. For simplicity, we’ll configure these form the Slush Discovery App.
Show me the goodness!
Co-mingled data sits in the discovery-app-content database. We are getting to the fun part of running the Slush Discovery App where the Range Indexes will be configured. Run the following at the root level of the ml-slush-discovery-app directory:
$ gulp serve-local
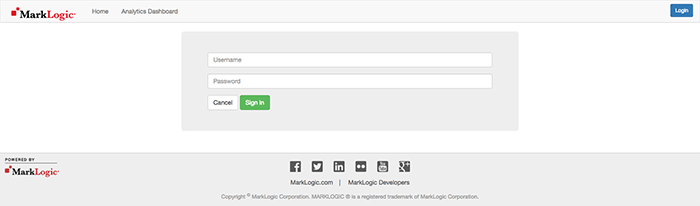
This will load up the app and open a browser window to http://localhost:3000/. It may not load completely on first run. Fear not! Refreshing the browser window should load it as expected:

Select the Login button in the upper-right and login using your admin credentials.
Once logged in, you’ll see the admin user has replaced the Login button along with some of the documents that were loaded into the Slush Discovery Database. Select it and then the Setup Option.

The setup options appear.
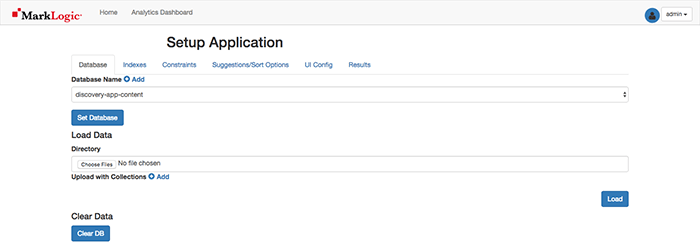
Ensure the Database Name is set to discovery-app-content (it should be selected by default). Select Set Database to save this setting and navigate to the Indexes Tab.
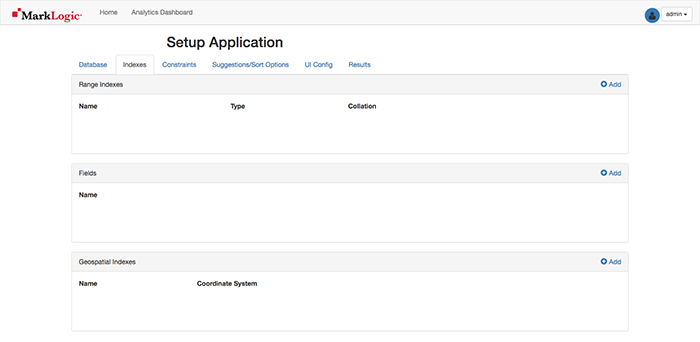
Select the Add button for the top Range Indexes section so we can add a Range Index for generic_name (string). Where did generic_name come from? It was a column header from the CSV we loaded into MarkLogic with MLCP and is now an XML element in the data set (e.g. <generic_name> ). If you are using your own data set, you could use other desirable XML elements for your range indexes.
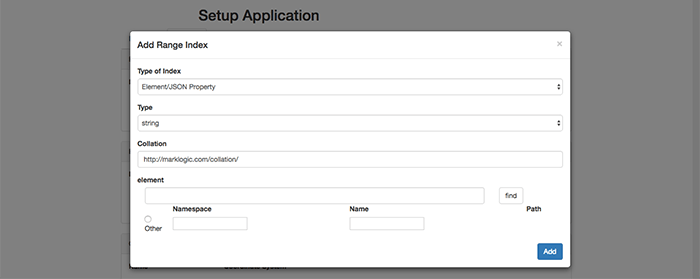
You then select the appropriate Type of Index (Element/JSON Property) and Type (string). Then, enter the name of the element into the bottom element field (generic_name) and select the white find button to the right.
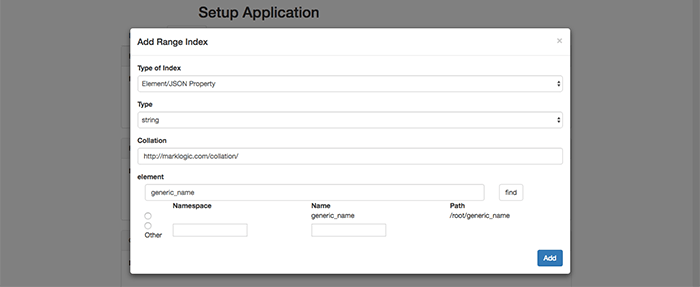
Select the radio button corresponding to the desired item for a Range Index, select the Add button, and you are all set.
Now that you’ve created one range index, you can create others for: nppes_provider_city (string), nppes_provider_state (string), specialty_description (string), total_claim_count (int), and total_day_supply (int), to name a few. The total_drug_cost column is certainly of interest but we’ll save transforms for a future post. ;) Be careful to select the correct Type of Index and Type as you go along.

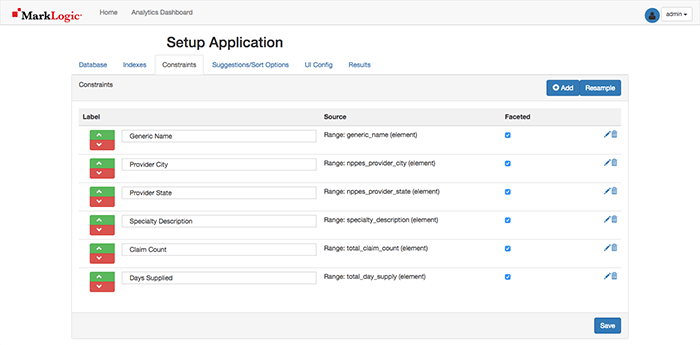
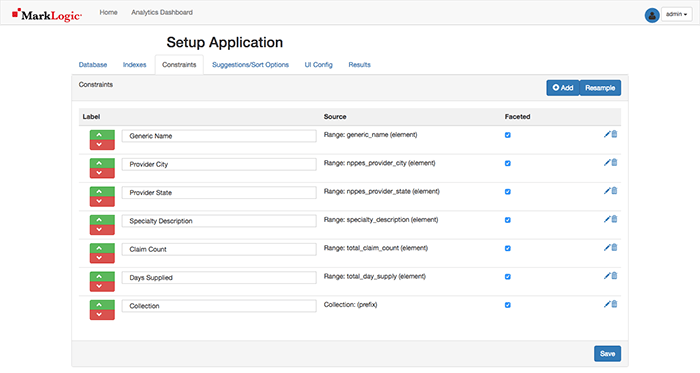
Navigate to the Constraints Tab. The Range Indexed items are displayed. You may need to select the blue Resample button in the upper-right corner to see them. Items may be re-named (as I’ve done below), re-ordered, or deleted. There is also a Faceted option which allows definition of which elements I can filter on similar to the Amazon example with the 70” flat screen TV.
Secret trick here: select the Add button to add another Facet on the Collection names in the database.
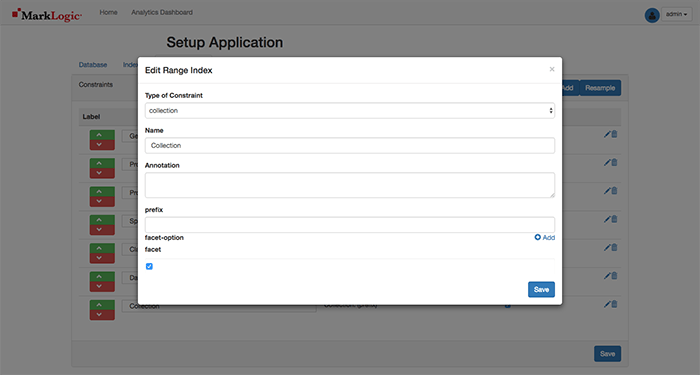
Enter Collection for the Name, check the Facet checkbox, and then select the Save button on the pop-up and Save again on the page to save all of the settings.
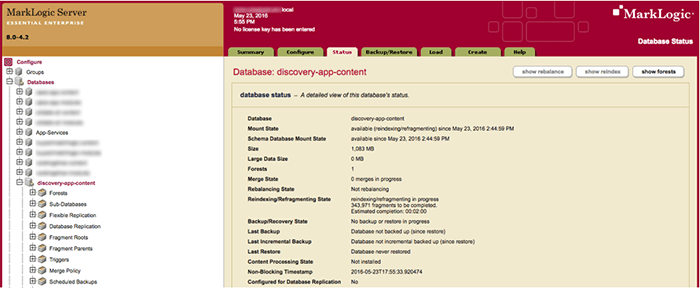
This may take you to the Results Tab and show you an error (depending on your database size):
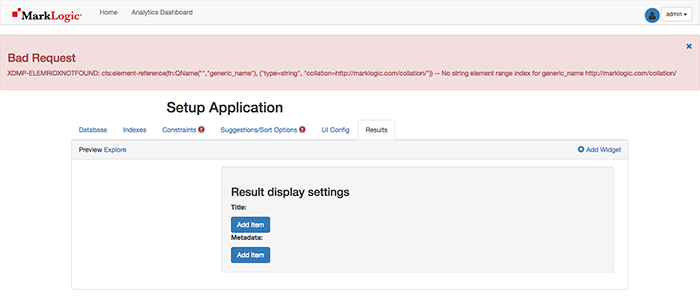
That’s ok. If you were to look at the Admin UI, and navigate to Configure > Databases > discovery-app-content > Status Tab, you would see that the database is reindexing/refragmenting per your configurations. These errors will persist in the app until it is done as of this writing.
In the App, return to the Constraints Tab and you will see the settings as desired.
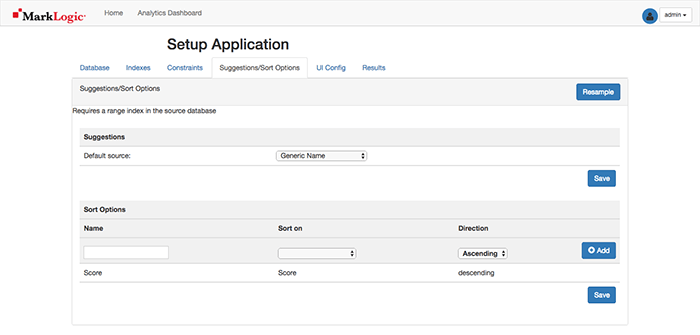
On the Suggestions/Sort Options Tab, a range indexed element value may be chosen for type-ahead searching similar to the way Google operates. Select the Resample and the first drop-down to Generic Name if using the claims data set or another option of interest. If you do not see any values, tap the Resample button. Select Save when done.
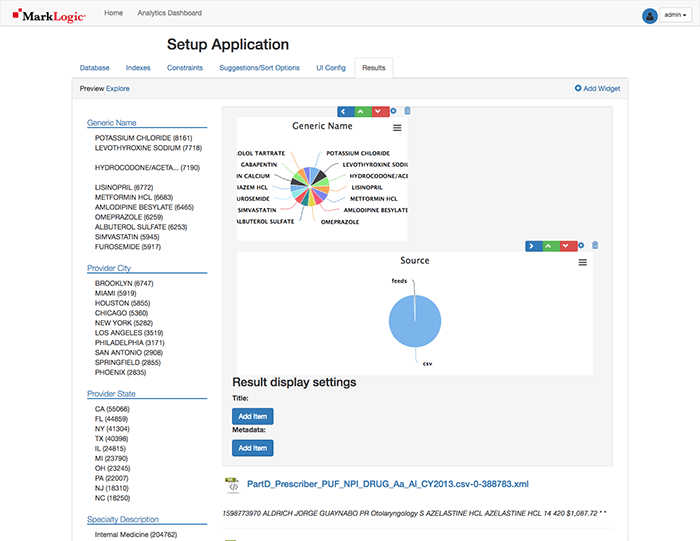
Navigate to the Results Tab for a preview of the Search application leaving the UI Config options blank (as of this writing, they do not work as desired). Note: The screenshot does not show all the facets.
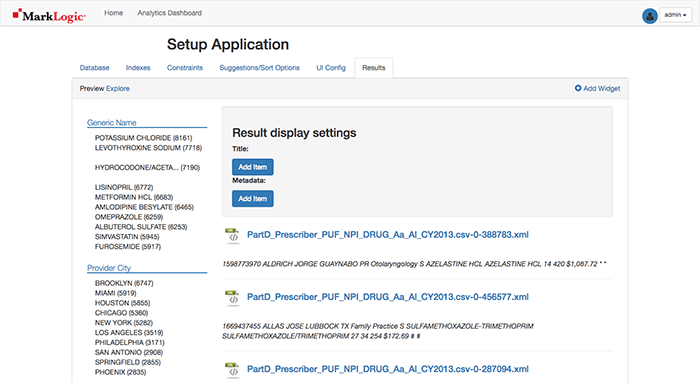
It could be helpful to see a pie chart of the top 15 Generic Names in the data set. Select the Add Widget button.
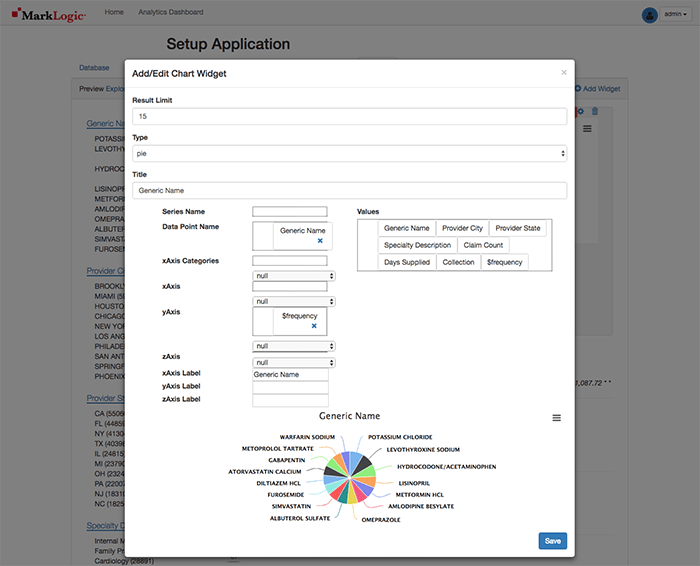
As shown above, change the Title to Generic Name, move the Generic%20Name value to the Data Point Name area below and select Save. The Widget is now displayed on the page Results Preview.
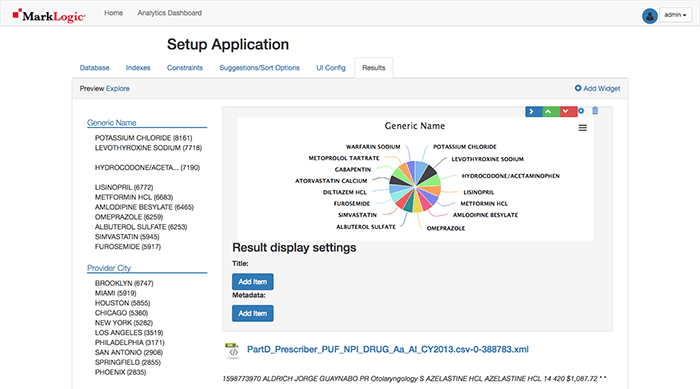
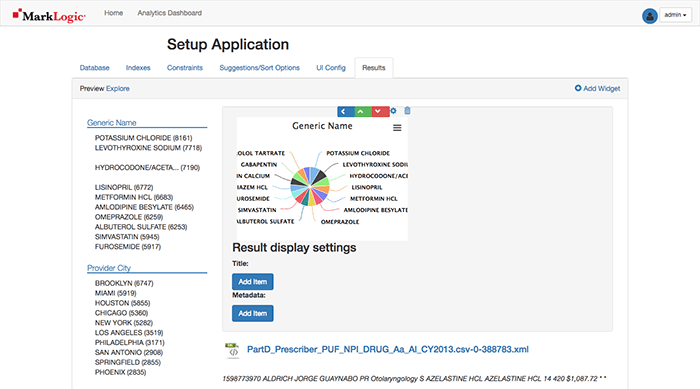
Selecting the blue arrow pointing to the right will change the pie chart’s width to half-width making room for the next widget.
We’ll want to visually display how many documents originated from each source using the collections constraint, since MarkLogic is so good at integrating data from silos. To do so, select the Add Widget button, remove Generic%20Name from Series Name and drag Collection to Data Point Name, and change the Title to Source.
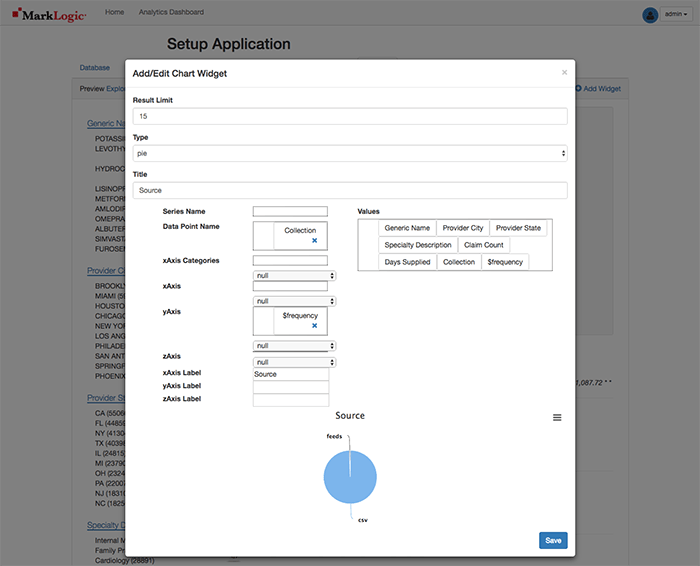
Select the Save button.
Uh oh! The Pie charts are not side-by-side.
No problem! Select the blue arrow pointing to the upper-right of the Source pie chart.
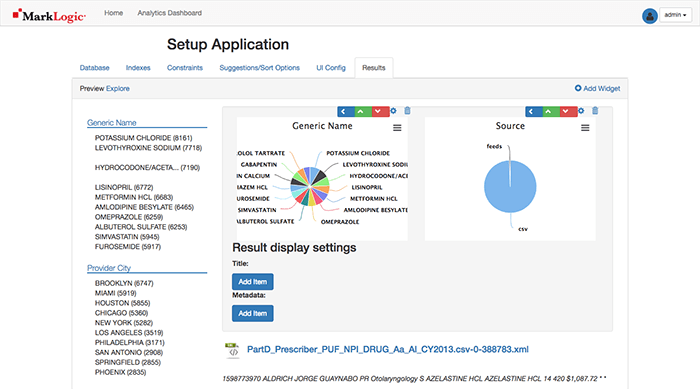
Ahhh… That’s better! Navigate to the Home link in the top navigation bar.
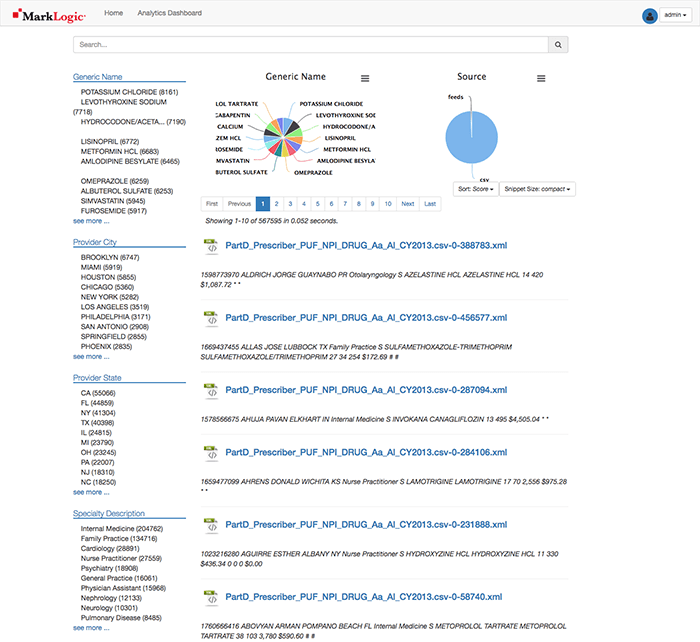
Here are the results of your work displayed in the ml-slush-discovery-app application where you can: select the facets on the left to filter the results, search using the aforementioned MarkLogic search grammar from the search:search example into the search bar and select the result links to see the content of the document selected.
The document results allow you to view the elements and text hierarchically, in JSON, or XML (MarkLogic does store both JSON and XML natively):
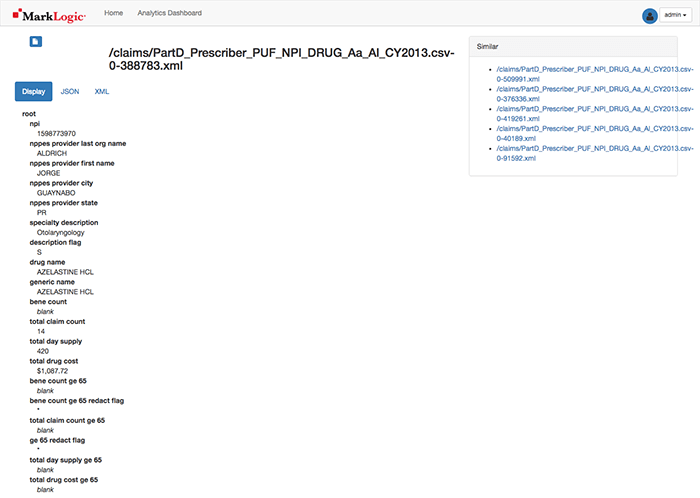
Sometimes, the results do not look the way I wanted. No big deal! Query Console and the ml-slush-discovery-app allow you to update the configuration, transform the data, make changes, and redeploy. I can quickly iterate on this a few times until I get things to look the way I want. That’s the power of MarkLogic!
Exploring the Data through Facets and Search – Some Ideas
We may want to explore through our data when we have some ideas about what we are looking for. Facets can help. In the claims data set, we can select the following facets:
Provider City: Chicago
Days Supplied: 360
Specialty Description: Psychiatry
With that, the Generic Names prescribed for 360 Days by Chicago doctors specializing in Psychiatry are displayed. Interesting insights!
Facets are also useful though and can help us to answer questions and explore our information, but when we don’t know what we’re looking for, this is where full text search can help us as well. The app’s search bar leverages MarkLogic’s Search API, which comes with a Google-style grammar for writing powerful searches.
Clear your facets to begin by selecting the x-es on the selected facets in the upper-left. Here are some ideas of searches to run:
Psychiatry neurology
Psychiatry AND neurology
Note with this search there are only a few matching documents with these terms in them. Combining full text search and faceted navigation to find the information that’s important to us is very powerful!
Psychiatry OR neurology
We could search on the phrase “Psychiatry neurology” (with quotes) but that would not return any results in this data set.
If you find any other good phrases to search on, please comment below. :)
The default grammar for searches includes NEARs for proximity searches, GT, LT, NOT_IN, () for precedence, and a whole lot of other options, but you can also extend for your particular requirements if you already have a particular grammar you may be currently use in-house or find a particular grammar that is more intuitive for your needs.
Cleaning up…
You may shut down the app with a Ctrl+c in the terminal window.
To remove the Slush Discovery database from its components from MarkLogic, issue the following:
WARNING: This will complete remove the Slush Discovery App Database with any data you loaded into your MarkLogic instance and restart MarkLogic. Trust me, these commands have their desired effects. :)
NOTE: Windows users will use Git Bash instead of the Windows command prompt and will use ml.bat instead of ml.
$ ./ml local wipe
$ ./ml local restart
Feel free to leave the ml-slush-discovery app folder so you may use it for the next post or your own future use to visualize data in MarkLogic quickly.
Summary
Congratulations on taking the first steps to unthink and free your data with MarkLogic! We’ve only just begun scratching the surface of MarkLogic’s capabilities in this blog post.

Tom McGrath
Tom is a Technology Manager with 15 years of combined experience working with web, mobile, e-commerce, software as a service and business intelligence solutions. After working exclusively with relational technologies, Tom quickly made the transition to NoSQL with MarkLogic in March 2015 and enjoys showing others how to do the same.
Comments
Topics
- Application Development
- Mobility
- Digital Experience
- Company and Community
- Data Platform
- Secure File Transfer
- Infrastructure Management
Sitefinity Training and Certification Now Available.
Let our experts teach you how to use Sitefinity's best-in-class features to deliver compelling digital experiences.
Learn MoreMore From Progress


Latest Stories
in Your Inbox
Subscribe to get all the news, info and tutorials you need to build better business apps and sites