Deploying a Marklogic Cluster using Kubernetes and NGINX

The process explained in this blog post was accurate at the time of publication, but if you’re looking to deploy a MarkLogic cluster on Kubernetes today, refer to our latest blog post, “7 Quick Steps to Setting Up MarkLogic Server in Kubernetes.”
This blog will explain the steps required to deploy and manage a 3-node MarkLogic cluster using Kubernetes and will also set up an NGINX container to manage ingress/access to each MarkLogic node. Let’s get started!
MarkLogic officially supports Docker containers with version 9.0-5 or later. Please use discretion when working with these examples using older versions of MarkLogic.
Assumptions
The following assumptions are made before beginning this walk-through. You’ll need to make sure you’ve got this initial setup completed before continuing.
- Docker v 1.12+
- Docker for Mac Installed
- Mac OS Sierra (should be compatible with earlier versions though)
- VirtualBox version5.0.30+
- Minikube version 0.12.2+
- Kubectl installed
- MarkLogic Server 8.0.5+
- You have a decent familiarity with Docker in general.
- You have a private Docker Registry setup to hold the MarkLogic and NGINX images we’re going to build in the following steps.
Getting Started
Running containers inside of Kubernetes relies upon having a local/private registry (or public) available to pull the images from. This document will not cover setting up the private registry. See Setting up a Private Registry for more information. You will also need to download the MarkLogic 64-bit RPM (AMD64, Intel EM64T)) from MarkLogic.
- Create a folder on your local system to hold our configuration files/scripts and MarkLogic RPM
- Move the MarkLogic RPM you downloaded to this folder
- Create a file called “Dockerfile” and copy the code below to setup our MarkLogic Docker container
FROM centos:centos7
MAINTAINER <Add your information here>
# Install required libraries for MarkLogic and container
RUN yum update -y &&
  yum install -y deltarpm initscripts glibc.i686 gdb.x86_64 redhat-lsb.x86_64 &&
  yum clean all
#Set default directory when attaching to container
WORKDIR /opt
# Set Environment variables for MarkLogic
ENV MARKLOGIC_INSTALL_DIR /opt/MarkLogic
ENV MARKLOGIC_DATA_DIR /data
ENV MARKLOGIC_FSTYPE ext4
ENV MARKLOGIC_USER daemon
ENV MARKLOGIC_PID_FILE /var/run/MarkLogic.pid
ENV MARKLOGIC_MLCMD_PID_FILE /var/run/mlcmd.pid
ENV MARKLOGIC_UMASK 022
ENV PATH $PATH:/usr/local/sbin:/usr/local/bin:/usr/sbin:/usr/bin:/sbin:/bin:/opt/MarkLogic/mlcmd/bin
#MarkLogic RPM package to install
ARG MARKLOGIC_RPM=MarkLogic-RHEL7-8.0-5.8.x86_64.rpm
#Copy MarkLogic RPM to to image
COPY ${MARKLOGIC_RPM} /tmp/${MARKLOGIC_RPM}
#Copy configuration file to image. Config file is used by initialization scripts
COPY mlconfig.sh /opt
# Copy entry-point init script to image
COPY entry-point.sh /opt
# Copy setup-enode script to image
COPY setup-child.sh /opt
# Copy the setup-master script to the image
COPY setup-master.sh /opt
# Set file permissions of configuration scripts
RUN chmod a+x /opt/entry-point.sh &&
  chmod a+x /opt/setup-child.sh &&
  chmod a+x /opt/setup-master.sh
#Install MarkLogic
RUN yum -y install /tmp/${MARKLOGIC_RPM} && rm /tmp/${MARKLOGIC_RPM}
# Setting ports to be exposed by the container. Add more if your application needs them
EXPOSE 7997 7998 7999 8000 8001 8002
This configuration will create a Docker image with MarkLogic installed and will copy the necessary initialization scripts to set up each MarkLogic node and create the cluster. Don’t build the image just yet, as we still need to create the scripts.
Initialization Scripts
There are four scripts used in this example.
- entry-point.sh – This is the entry point script for the container. This script will run in the background to ensure the container doesn’t exit after the scripts are finished running, start the MarkLogic server, and will also intercept the term signal when the container exits to gracefully shutdown MarkLogic.
#!/bin/bash
####################################################################
# This script provides an entry point for setting up master and child
# MarkLogic nodes and keeping service running
####################################################################
CONFIGURATION_FILE_LOCATION='/opt/mlconfig.sh'
HOST_NAME=`hostname`
# SIGTERM-handler
function term_handler {
  echo "Shutting down MarkLogic instance..."
  /etc/init.d/MarkLogic stop
  sleep 3
  exit 0;
}
echo "Starting MarkLogic..."
/etc/init.d/MarkLogic start
sleep 3
trap term_handler SIGTERM SIGINT
# If an alternate configuration file is passed in then use that
if [ ! -z "$2" ]; then
  CONFIGURATION_FILE_LOCATION=$2
fi
if [[ "${HOST_NAME}" == "marklogic-0"* ]]; then
  echo "Setting up Master Node"
  ./setup-master.sh $CONFIGURATION_FILE_LOCATION
else
  echo "Setting up Child Node"
  # NOTE - The marklogic-0.ml-service will have to account for real DNS entries
  ./setup-child.sh "marklogic-0.ml-service.default.svc.cluster.local" $CONFIGURATION_FILE_LOCATION
fi
# Do nothing loop to keep script active so it can intercept the container stop signal to shut down MarkLogic
while true; do :; done- setup-master.sh – This script is called by the entry-point script and performs the procedures for initializing the MarkLogic server and setting up security
#!/bin/bash
####################################################################
# This script aids with setting up a MarkLogic server
# running inside a docker container
####################################################################
CONFIG_FILE="${1}"
######################################################################
BOOTSTRAP_HOST=`hostname`
CURL="curl -s -S"
SKIP=0
RETRY_INTERVAL=5
N_RETRY=10
BOOTSTRAP_HOST_ENC="$(perl -MURI::Escape -e 'print uri_escape($ARGV[0]);' "$BOOTSTRAP_HOST")"
######################################################################
function restart_check {
  echo "Restart check for ${BOOTSTRAP_HOST}..."
  LAST_START=`$AUTH_CURL --max-time 1 -s "http://localhost:8001/admin/v1/timestamp"`
  for i in `seq 1 ${N_RETRY}`; do
    # continue as long as timestamp didn't change, or no output was returned
    if [ "$2" == "$LAST_START" ] || [ "$LAST_START" == "" ]; then
      sleep ${RETRY_INTERVAL}
      echo "Retrying..."
      LAST_START=`$AUTH_CURL --max-time 1 -s "http://localhost:8001/admin/v1/timestamp"`
    else
      return 0
    fi
  done
  echo "ERROR: Line $3: Failed to restart $1"
  exit 1
}
######################################################################
if [ -f $CONFIG_FILE ]; then
  printf "mlconfig script found. Running setupn"
  source $CONFIG_FILE
  echo "     USER: ${USER}"
  echo " PASSWORD: ${PASSWORD}"
  echo "AUTH_MODE: ${AUTH_MODE}"
  echo "HOST_NAME: ${HOST_NAME}"
  echo "SEC_REALM: ${SEC_REALM}"
  echo "  VERSION: ${VERSION}"
  AUTH_CURL="${CURL} --${AUTH_MODE} --user ${USER}:${PASSWORD}"

  # (1) Initialize the server
  echo "Initializing $BOOTSTRAP_HOST..."
  $CURL -X POST -d "" http://localhost:8001/admin/v1/init
  sleep 10
  # (2) Initialize security and, optionally, licensing. Capture the last
  #     restart timestamp and use it to check for successful restart.
  echo "Initializing security for $BOOTSTRAP_HOST..."
  TIMESTAMP=`$CURL -X POST
     -H "Content-type: application/x-www-form-urlencoded"
     --data "admin-username=${USER}" --data "admin-password=${PASSWORD}"
     --data "realm=${SEC_REALM}"
     http://localhost:8001/admin/v1/instance-admin
     | grep "last-startup"
     | sed 's%^.*<last-startup.*>(.*)</last-startup>.*$%1%'`
  if [ "$TIMESTAMP" == "" ]; then
    echo "ERROR: Failed to get instance-admin timestamp." >&2
    exit 1
  fi
  # Test for successful restart
  restart_check $BOOTSTRAP_HOST $TIMESTAMP $LINENO
  echo "Removing network suffix from hostname"
  $AUTH_CURL -o "hosts.html" -X GET "http://localhost:8001/host-summary.xqy?section=host"
  HOST_URL=`grep "statusfirstcell" hosts.html
    | grep ${BOOTSTRAP_HOST}
    | sed 's%^.*href="(host-admin.xqy?section=host&host=[^"]*)".*$%1%'`
  HOST_ID=`grep "statusfirstcell" hosts.html
    | grep ${BOOTSTRAP_HOST}
    | sed 's%^.*href="host-admin.xqy?section=host&host=([^"]*)".*$%1%'`
  echo "HOST_URL is $HOST_URL"
  echo "HOST_ID is $HOST_ID"
  $AUTH_CURL -o "host.html" -X GET "http://localhost:8001/$HOST_URL"
  HOST_XPATH=`grep host-name host.html
    | grep input
    | sed 's%^.*name="([^"]*)".*$%1%'`
  echo "HOST_XPATH is $HOST_XPATH"
  # Backwards-compat with old curl
  HOST_ID_ENC="$(perl -MURI::Escape -e 'print uri_escape($ARGV[0]);' "$HOST_ID")"
  $AUTH_CURL -X POST
             --data "host=$HOST_ID_ENC"
             --data "section=host"
             --data "$HOST_XPATH=${BOOTSTRAP_HOST_ENC}.ml-service"
             --data "ok=ok"
             "http://localhost:8001/host-admin-go.xqy"
  /sbin/service MarkLogic restart
  echo "Waiting for server restart.."
  sleep 5
  rm *.html
  echo "Initialization complete for $BOOTSTRAP_HOST..."
  exit 0
######################################################################
else
  printf "nnmlconfig script not found! Exiting initialization"
fi- setup-child.sh – This script is also called by the entry-point script and performs the steps for initializing the MarkLogic server as well as joining the server to the MarkLogic cluster
#!/bin/bash
####################################################################
# This script will join a MarkLogic server to a cluster
# running inside a docker container
####################################################################
JOINING_HOST=`hostname`
BOOTSTRAP_HOST="$1"
CONFIG_FILE="${2}"
SKIP=0
RETRY_INTERVAL=5
N_RETRY=10
BOOTSTRAP_HOST_STATUS=""
JOINING_HOST_ENC="$(perl -MURI::Escape -e 'print uri_escape($ARGV[0]);' "$JOINING_HOST")"
source $CONFIG_FILE
CURL="curl -s -S"
AUTH_CURL="${CURL} --${AUTH_MODE} --user ${USER}:${PASSWORD}"
function restart_check {
  echo "Restart check for $1..."
  LAST_START=`$AUTH_CURL --max-time 1 -s "http://localhost:8001/admin/v1/timestamp"`
  echo "LAST_START: ${LAST_START}"
  for i in `seq 1 ${N_RETRY}`; do
    # continue as long as timestamp didn't change, or no output was returned
    if [ "$2" == "$LAST_START" ] || [ "$LAST_START" == "" ]; then
      sleep ${RETRY_INTERVAL}
      echo "Retrying..."
      LAST_START=`$AUTH_CURL --max-time 1 -s "http://localhost:8001/admin/v1/timestamp"`
      echo "LAST_START: ${LAST_START}"
    else
      return 0
    fi
  done
  echo "ERROR: Line $3: Failed to restart $1"
  exit 1
}
function node_available_check {
  $CURL --max-time 1 -s -o "host_status.html" "http://$BOOTSTRAP_HOST:7997"
  BOOTSTRAP_HOST_STATUS=`grep "Healthy" host_status.html`
  for i in `seq 1 ${N_RETRY}`; do
    # continue until status is healthy or max tries is reached
    if [ "" == "${BOOTSTRAP_HOST_STATUS}" ] || [ "Healthy" != "${BOOTSTRAP_HOST_STATUS}" ]; then
        sleep ${RETRY_INTERVAL}
        echo "Retrying..."
    $CURL --max-time 1 -s -o "host_status.html" "http://$BOOTSTRAP_HOST:7997"
    BOOTSTRAP_HOST_STATUS=`grep "Healthy" host_status.html`
    else
      return 0
    fi
  done
  echo "ERROR: Line $1: Failed to get $BOOTSTRAP_HOST healthy status"
  exit 1
}
echo "Verifying $BOOTSTRAP_HOST is available to join..."
## Verify host is available to join with
node_available_check $LINENO
if [ $? -ne 0 ]; then
  echo "Unable to verify ${1} is available after ${N_RETRY} attempts. Aborting script!"
  exit 1
fi
# (1) Initialize MarkLogic Server on the joining host
echo "Initializing MarkLogic server ..."
TIMESTAMP=`$CURL -X POST -d ""
 http://${JOINING_HOST}:8001/admin/v1/init
  | grep "last-startup"
  | sed 's%^.*<last-startup.*>(.*)</last-startup>.*$%1%'`
if [ "$TIMESTAMP" == "" ]; then
  echo "ERROR: Failed to initialize $JOINING_HOST" >&2
  exit 1
fi
restart_check $JOINING_HOST $TIMESTAMP $LINENO
echo "Retrieve $JOINING_HOST configuration..."
# (2) Retrieve the joining host's configuration
JOINER_CONFIG=`$CURL -X GET -H "Accept: application/xml" http://${JOINING_HOST}:8001/admin/v1/server-config`
echo $JOINER_CONFIG | grep -q "^<host"
if [ "$?" -ne 0 ]; then
  echo "ERROR: Failed to fetch server config for $JOINING_HOST"
  SKIP=1
fi
if [ "$SKIP" -ne 1 ]; then
  echo "Send $JOINING_HOST configuration to the bootstrap host $BOOTSTRAP_HOST ..."
  # (3) Send the joining host's config to the bootstrap host, receive
  #     the cluster config data needed to complete the join. Save the
  #     response data to cluster-config.zip.
  # Backwards-compat with old curl
  JOINER_CONFIG_ENC="$(perl -MURI::Escape -e 'print uri_escape($ARGV[0]);' "$JOINER_CONFIG")"
  $AUTH_CURL -X POST -o cluster-config.zip --data "group=Default"
             --data "server-config=${JOINER_CONFIG_ENC}"
             -H "Content-type: application/x-www-form-urlencoded"
             http://${BOOTSTRAP_HOST}:8001/admin/v1/cluster-config
  if [ "$?" -ne 0 ]; then
    echo "ERROR: Failed to fetch cluster config from $BOOTSTRAP_HOST"
    exit 1
  fi
  if [ `file cluster-config.zip | grep -cvi "zip archive data"` -eq 1 ]; then
    echo "ERROR: Failed to fetch cluster config from $BOOTSTRAP_HOST"
    exit 1
  fi
  echo "Send the cluster config data to the joining host $JOINING_HOST, completing the join sequence..."
  # (4) Send the cluster config data to the joining host, completing
  #     the join sequence.
  TIMESTAMP=`$CURL -X POST -H "Content-type: application/zip"
                   --data-binary @./cluster-config.zip
                   http://${JOINING_HOST}:8001/admin/v1/cluster-config
                   | grep "last-startup"
                   | sed 's%^.*<last-startup.*>(.*)</last-startup>.*$%1%'`

  echo "Restart check $JOINING_HOST $TIMESTAMP ..."
  restart_check $JOINING_HOST $TIMESTAMP $LINENO
  rm ./cluster-config.zip
  echo "...$JOINING_HOST successfully added to the cluster."
fi
echo "Removing network suffix from hostname"
$AUTH_CURL -o "hosts.html" -X GET "http://${JOINING_HOST}:8001/host-summary.xqy?section=host"
HOST_URL=`grep "statusfirstcell" hosts.html
  | grep ${JOINING_HOST}
  | sed 's%^.*href="(host-admin.xqy?section=host&host=[^"]*)".*$%1%'`
HOST_ID=`grep "statusfirstcell" hosts.html
  | grep ${JOINING_HOST}
  | sed 's%^.*href="host-admin.xqy?section=host&host=([^"]*)".*$%1%'`
echo "HOST_URL is $HOST_URL"
echo "HOST_ID is $HOST_ID"
$AUTH_CURL -o "host.html" -X GET "http://${JOINING_HOST}:8001/$HOST_URL"
HOST_XPATH=`grep host-name host.html
  | grep input
  | sed 's%^.*name="([^"]*)".*$%1%'`
echo "HOST_XPATH is $HOST_XPATH"
# Backwards-compat with old curl
HOST_ID_ENC="$(perl -MURI::Escape -e 'print uri_escape($ARGV[0]);' "$HOST_ID")"
$AUTH_CURL -X POST
           --data "host=$HOST_ID_ENC"
           --data "section=host"
           --data "$HOST_XPATH=${JOINING_HOST_ENC}.ml-service"
           --data "ok=ok"
           "http://${JOINING_HOST}:8001/host-admin-go.xqy"
/sbin/service MarkLogic restart
echo "Waiting for server restart.."
sleep 5
echo "$JOINING_HOST initialized and joined to cluster..."
rm *.html- mlconfig.sh – This is a simple configuration file that can be modified for your particular settings/environment and is used by the initialization scripts above
#!/bin/bash
#MASTER ML NODE CONFIGURATION PARAMETERS
AUTH_MODE="anyauth"
PASSWORD="password"
USER="admin"
SEC_REALM="public"
LICENSE_FILE_FOLDER=/opt
VERSION=8
HOST_NAME=`hostname`
Ok, that’s it for creating the Docker file to build the image as well as creating our initialization scripts. Next, let’s go ahead and build our image. In a terminal window, navigate to the folder you created to store the Dockerfile and scripts, and enter:
docker build -t <your registry/your image name>:<image tag> .
Your command should look something like “docker build -t 192.168.1.11/my-ml-image:v1 .“. Don’t forget to add the “.” at the end of the command (this tells Docker to look in the current directory for the Dockerfile to use). Now that you’ve built your image, you need to push it to your registry.
docker push <your registry/your image name>:<image tag>
Creating the Kubernetes Configuration Files
Kubernetes is an open-source tool for automating the deployment, scaling, and management of containerized applications. We’ll use the Kubectl CLI downloaded earlier to deploy, inspect, and interact with our deployed environment. Additionally, Minikube will provide the environment for hosting our Kubernetes-managed services. The Minikube VM is already preconfigured with the necessary services to run our applications. Now, we need to create the Kubernetes configuration files to use when deploying and managing our MarkLogic environment. The files can be in either JSON or YAML format. I’ve chosen YAML for this example. Please make sure you use correct formatting (indentation) when copying these files. You can use an online tool iike YAMLLint to make sure the file is correctly formatted, if you run into problems.
Let’s build the configuration for our MarkLogic Pods.
NOTE: Pods are individual units that contain 1..n Docker containers. 1..n Pods run on individual Nodes
MarkLogic PetSet Configuration
apiVersion: apps/v1alpha1
kind: PetSet
metadata:
  name: marklogic
spec:
  serviceName: "ml-service"
  replicas: 3
  template:
    metadata:
      labels:
        app: marklogic
      annotations:
        pod.alpha.kubernetes.io/initialized: "true"
    spec:
      terminationGracePeriodSeconds: 30
      containers:
        - name: 'marklogic'
          image: <your registry/your container name>:<image tag>
          imagePullPolicy: Always
          command: ["/opt/entry-point.sh"]
          ports:
            - containerPort: 7997
              name: health-check
            - containerPort: 7998
              name: cluster-port
            - containerPort: 7999
              name: cluster-port2
            - containerPort: 8000
              name: app-services
            - containerPort: 8001
              name: admin
            - containerPort: 8002
              name: manage
          lifecycle:
            preStop:
              exec:
                # SIGTERM triggers a quick exit; gracefully terminate instead
                command: ["/etc/init.d/MarkLogic stop"]
          volumeMounts:
            - name: ml-data
              mountPath: /var/opt/MarkLogic
      imagePullSecrets:
      - name: registry-secret
  volumeClaimTemplates:
    - metadata:
        name: ml-data
        annotations:
          volume.alpha.kubernetes.io/storage-class: anything
      spec:
        accessModes: [ "ReadWriteOnce" ]
        resources:
          requests:
            storage: 1Gi
One of the first things to note is that the “kind” of service being deployed is a PetSet. “A PetSet is a group of stateful pods that require a stronger notion of identity. The document refers to these as “clustered applications”. Normally, pods are created and destroyed with no notion of persistence or identity. In our case, we need to be able to persist the data for each node as well as the same container “identity” so that when a MarkLogic pod is replaced for whatever reason, it is recognizable by the cluster and will use the same data as the previous pod it replaced. Let’s inspect the configuration sections.
Update to PetSets
Note: PetSets have been replaced with a “StatefulSet” in versions 1.5 Beta+ of Kubernetes. A StatefulSet is a Controller that provides a unique identity to its Pods. It provides guarantees about the ordering of deployment and scaling.
If you run Minikube version 0.14.0+ you must use a StatefulSet instead of a PetSet. Modify the following lines in the PetSet configuration to create a StatefulSet. After modification, save the file and you’re done.
- line 1 – change apiVersion from apps/v1alpha1 to apps/v1beta1
- line 2 – change kind from PetSet to StatefulSet
- lines 12-13 regarding the annotations – comment out or remove
Let’s quickly review the various sections within the file.
- Lines 3 – 11
- metadata.name – This will be the name for our service.
- spec.serviceName – This references the networking service we’ll create later on.
- spec.replicas – Specifies we want to initially create and always have exactly 3 Pods running.
- spec.template.metadata.labels.app – The “labeling” applied to this service. Read more about Labels & Selectors on the Kubernetes website.
- Lines 14 – 43
- spec.terminationGracePeriodSeconds – Allows 30 seconds for the Pod to gracefully terminate before killing the process.
- spec.containers – Allows you to specify 1..n containers to run.
- name – The based name to use for each container. I.e. marklogic-0, marklogic-1, etc.
- image – The image each container will be based upon.
- imagePullPolicy – Specifies to ALWAYS pull a fresh image from the registry when the service is instantiated. Can also be set to “IfNotPresent” or “Never”.
- command – The default command/script to run when the container is started.
- ports – The ports on the container we’re going to publicly expose.
- lifecycle.preStop.exec.command – Specifies a script/command to run when the container receives a SIGTERM signal.
- volumeMounts – Specifies the folder/file within the container to mount to the “volume mount”.
- imagePullsecrets – Specifies the name of the “secret” were using for authenticating to our Docker Registry when the container pulls the image.
- Lines 44 – 53
- volumeClaimTemplates
- metadata.name – The name to use for this “volumeClaimTemplate”. Note, this name is referenced in the volumnMounts.name of the container specification.
- annotations
- volume.alpha.kubernetes.io/storage-class – Specifies the underlying driver to use for the volume claim. We’re simply mounting to our host file system, but other drivers are available to support Cloud deployments and more.
- spec
- accessModes – Specifies the Read/Write permissions. See Access Modes in the Persistent Volume documentation.
- resources.requests.storage – The amount of storage we want to request when the volume claim is made
A “volumeClaimTemplate” basically defines a template for each container to use when claiming persistent storage on the host. These volume claims request storage on our host system (Minikube in this case) for persisting our MarkLogic data. This data will persist between Pod restarts so long as you don’t “delete” the Minikube instance or delete the PersistentVolume from the environment. In our Kubernetes configuration file, we’re specifying we want to map the entire /var/opt/MarkLogic directory to our host file system. This mapping could be made more specific if you’d like (i.e. instead of mappint the entire /var/opt/MarkLogic directory you could map sub-directories within the MarkLogic one). See Persistent Volumes for additional information.
- volumeClaimTemplates
Creating the Registry Authentication Secret
This “Secret” is used by Kubernetes to authenticate with the Docker Registry when it pulls an image. You may or may not require this depending on how your registry is set up, but I’ll include an example Secret below:
- In your working directory, create a file called registry-secret.yml and paste the code block below.
- Follow the instructions in the heading of the example below to create your own unique “secret” to use for registry authentication.
# This Secret is used to authenticate to the dcgs-registry where images are stored
# To use your own credentials, you need to base64 encode your config.json file
# usually located here on Mac /Users/<your username here>/.docker/config.json.
# To encode the file and get the output use the following command:
# openssl base64 -in /Users/<username>/.docker/config.json -out /Users/<username>/.docker/config_base64.txt
# Then copy the content inside the config_base64.txt file and paste it as the value for .dockerconfigjson
apiVersion: v1
kind: Secret
metadata:
  name: registry-secret
  namespace: default
data:
  .dockerconfigjson: ewoJImF1dGhzIjogewoJCSIxOTIuMTY4LjEyMy4yMzgiOiB7CgkJCSJhdXRoIjogIlltbHNiRHBDTURCMGN6RXlNdz09IgoJCX0KCX0KfQ==
type: kubernetes.io/dockerconfigjson
The important piece here is the .dockerconfigjson. The string here for the value is our encrypted credentials for authentication to the private Docker Registry. Yours will obviously be different. The comments at the beginning of the file should help to explain how to create this string.
That completes our brief introduction to the PetSet specification for our MarkLogic deployment. Next we’ll look at our Service that will support the networking interface to our Pods.
MarkLogic Service
#DEFINE SERVICE FOR MANAGING PODS
apiVersion: v1
kind: Service
metadata:
  name: ml-service
  namespace: default
  labels:
    app: marklogic
  annotations:
    service.alpha.kubernetes.io/tolerate-unready-endpoints: "true"
spec:
  clusterIP: None
  selector:
    app: marklogic
  ports:
    # PORT - is the abstracted Service port, which can be any port other pods use to access the Service
    # TARGETPORT - is the port the container accepts traffic on
    - protocol: TCP
      port: 7997
      targetPort: 7997
      name: health-check
    - protocol: TCP
      port: 7998
      targetPort: 7998
      name: cluster-port2
    - protocol: TCP
      port: 7999
      targetPort: 7999
      name: cluster-port
    - protocol: TCP
      port: 8000
      targetPort: 8000
      name: app-services
    - protocol: TCP
      port: 8001
      targetPort: 8001
      name: admin
    - protocol: TCP
      port: 8002
      targetPort: 8002
      name: manage
Let’s review the different portions of this configuration.
- Lines 1 – 10
- kind – This specifies the type of configuration being deployed
- metadata
- name – The name of the service supporting our MarkLogic PetSet. Note, you can deploy multiple services that can support various portions of your deployment architecture.
- namespace – Resources deployed and managed by Kubernetes can be assigned to a namespace. The default namespace is “default”
- labels
- app – Specifies the label to be applied to the service.
- annotations
- service.alpha.kubernetes.io/tolerate-unready-endpoints – An annotation on the Service denoting if the endpoints controller should go ahead and create endpoints for unready pods.
- Lines 11 – 41
- spec
- clusterIP – Specifying “None” creates a Headless Service
- selector
- app – Associates this service to the MarkLogic PetSet
- ports – List the ports to expose on each Pod being run
- protocol – The specific network protocol to allow
- port – The abstracted Service port, which can be any port other pods use to access the Service
- targetPort – The port the container accepts traffic on
- name – Friendly name to assign to this port
Repeat this section for every port you want to expose on your containers. Next, let’s set up the NGINX load balancer.
- spec
NGINX Load Balancer
The NGINX provides two services for our MarkLogic cluster.
- Obviously, it provides load balancing between the nodes in the cluster from outside the Kubernetes internal network.
- Allows us to access each node individually. Remember, we have a single service supporting all three nodes in the cluster (single ingress point to the environment) so in order to reach a specific node within the cluster from the outside we need NGINX to “front” all requests to the environment and provide the correct routing to individual MarkLogic hosts.
This blog post will not go into detail about NGINX, but will explain the configurations implemented. The first thing to do is create our custom NGINX image. Just like before when we created our MarkLogic image, we need to create a Dockerfile for our NGINX configuration. This image will be based upon the standard NGINX image you’d get from the Docker Registry and will also include the custom NGINX configuration we need for our setup.
- Create another folder to hold our NGINX Dockerfile and associated configuration file(s)
- Your Dockerfile should look like this:
FROM nginx:alpine
RUN ln -sf /proc/1/fd/1 /var/log/nginx/access.log
  && ln -sf /proc/1/fd/2 /var/log/nginx/error.log
COPY nginx.conf /etc/nginx/nginx.conf
COPY upstream-defs.conf /etc/nginx/upstream-defs.conf
RUN rm /etc/nginx/conf.d/*
RUN mkdir /nginx_cache
EXPOSE 7997 7998 7999 8000 8001 8002
- Now, create a file called nginx.conf. This file will configure our NGINX image to correctly route and loadbalance between our MarkLogic hosts. It should have the following code copied to it:
user nginx; worker_processes 1; pid /run/nginx.pid; events { worker_connections 1024; # multi_accept on; } http { log_format main '$remote_addr - $remote_user [$time_local] "$request" ' '$status $body_bytes_sent "$http_referer" ' '"$http_user_agent" "$http_x_forwarded_for"'; ######## GZIP SETTINGS ####### gzip on; gzip_http_version 1.0; gzip_comp_level 2; gzip_proxied any; gzip_min_length 1100; gzip_buffers 16 8k; gzip_types text/plain text/css application/x-javascript text/xml application/xml application/xml+rss text/javascript; ######## CACHE ######## proxy_cache_path /nginx_cache levels=1:2 keys_zone=staticcache:8m max_size=50m; proxy_cache_valid 200 302 10m; proxy_cache_valid 404 1m; proxy_cache_lock on; proxy_cache_use_stale error invalid_header timeout updating; sendfile on; tcp_nopush on; tcp_nodelay on; keepalive_timeout 65; types_hash_max_size 2048; # server_tokens off; server_names_hash_bucket_size 128; server_name_in_redirect off; default_type application/octet-stream; include /etc/nginx/mime.types; #Upstream Server definitions imported here include upstream-defs.conf; ################################ 8000 ################################ server { listen 8000; # Configuration to ensure html resources are properly referenced when # specifying a particular node to route to # NOTE: Ensure you update the "rewrite" regex to include additional nodes # i.e. ^/ml[0|1|2](/.*)$ $1 last; - add to the [x|x|x] the node number location ~* .(ico|css|js|gif|jpe?g|png)$ { rewrite ^/ml[0|1|2](/.*)$ $1 last; proxy_pass http://ml8000; proxy_cache staticcache; proxy_set_header X-Real-IP $remote_addr; proxy_set_header X-Forwarded-For $proxy_add_x_forwarded_for; proxy_set_header Host $http_host; proxy_cache_key "$proxy_host$uri$is_args$args"; proxy_cache_bypass $http_cache_control; add_header Cache-Control "public, must-revalidate, proxy-revalidate"; add_header X-Proxy-Cache $upstream_cache_status; expires 30d; } location /ml0/ { proxy_redirect off; proxy_set_header X-Real-IP $remote_addr; proxy_set_header X-Forwarded-For $proxy_add_x_forwarded_for; proxy_set_header Host $http_host; proxy_max_temp_file_size 0; client_max_body_size 10m; client_body_buffer_size 128k; proxy_connect_timeout 90; proxy_send_timeout 90; proxy_read_timeout 90; proxy_buffer_size 4k; proxy_buffers 4 32k; proxy_busy_buffers_size 64k; proxy_temp_file_write_size 64k; rewrite ^/ml0(/.*)$ $1 break; proxy_pass http://mlnode0_8000; } location /ml1/ { proxy_redirect off; proxy_set_header X-Real-IP $remote_addr; proxy_set_header X-Forwarded-For $proxy_add_x_forwarded_for; proxy_set_header Host $http_host; proxy_max_temp_file_size 0; client_max_body_size 10m; client_body_buffer_size 128k; proxy_connect_timeout 90; proxy_send_timeout 90; proxy_read_timeout 90; proxy_buffer_size 4k; proxy_buffers 4 32k; proxy_busy_buffers_size 64k; proxy_temp_file_write_size 64k; rewrite ^/ml1(/.*)$ $1 break; proxy_pass http://mlnode1_8000; } location /ml2/ { proxy_redirect off; proxy_set_header X-Real-IP $remote_addr; proxy_set_header X-Forwarded-For $proxy_add_x_forwarded_for; proxy_set_header Host $http_host; proxy_max_temp_file_size 0; client_max_body_size 10m; client_body_buffer_size 128k; proxy_connect_timeout 90; proxy_send_timeout 90; proxy_read_timeout 90; proxy_buffer_size 4k; proxy_buffers 4 32k; proxy_busy_buffers_size 64k; proxy_temp_file_write_size 64k; rewrite ^/ml2(/.*)$ $1 break; proxy_pass http://mlnode2_8000; } location / { proxy_redirect off; proxy_set_header X-Real-IP $remote_addr; proxy_set_header X-Forwarded-For $proxy_add_x_forwarded_for; proxy_set_header Host $http_host; proxy_max_temp_file_size 0; client_max_body_size 10m; client_body_buffer_size 128k; proxy_connect_timeout 90; proxy_send_timeout 90; proxy_read_timeout 90; proxy_buffer_size 4k; proxy_buffers 4 32k; proxy_busy_buffers_size 64k; proxy_temp_file_write_size 64k; proxy_pass http://ml8000; } } ################################ 8001 ################################ server { listen 8001; # Configuration to ensure html resources are properly referenced when # specifying a particular node to route to # NOTE: Ensure you update the "rewrite" regex to include additional nodes # i.e. ^/ml[0|1|2](/.*)$ $1 last; - add to the [x|x|x] the node number location ~* .(ico|css|js|gif|jpe?g|png)$ { rewrite ^/ml[0|1|2](/.*)$ $1 last; proxy_pass http://ml8001; proxy_cache staticcache; proxy_set_header X-Real-IP $remote_addr; proxy_set_header X-Forwarded-For $proxy_add_x_forwarded_for; proxy_set_header Host $http_host; proxy_cache_key "$proxy_host$uri$is_args$args"; proxy_cache_bypass $http_cache_control; add_header Cache-Control "public, must-revalidate, proxy-revalidate"; add_header X-Proxy-Cache $upstream_cache_status; expires 30d; } location /ml0/ { proxy_redirect off; proxy_set_header X-Real-IP $remote_addr; proxy_set_header X-Forwarded-For $proxy_add_x_forwarded_for; proxy_set_header Host $http_host; proxy_max_temp_file_size 0; client_max_body_size 10m; client_body_buffer_size 128k; proxy_connect_timeout 90; proxy_send_timeout 90; proxy_read_timeout 90; proxy_buffer_size 4k; proxy_buffers 4 32k; proxy_busy_buffers_size 64k; proxy_temp_file_write_size 64k; rewrite ^/ml0(/.*)$ $1 break; proxy_pass http://mlnode0_8001; } location /ml1/ { proxy_redirect off; proxy_set_header X-Real-IP $remote_addr; proxy_set_header X-Forwarded-For $proxy_add_x_forwarded_for; proxy_set_header Host $http_host; proxy_max_temp_file_size 0; client_max_body_size 10m; client_body_buffer_size 128k; proxy_connect_timeout 90; proxy_send_timeout 90; proxy_read_timeout 90; proxy_buffer_size 4k; proxy_buffers 4 32k; proxy_busy_buffers_size 64k; proxy_temp_file_write_size 64k; rewrite ^/ml1(/.*)$ $1 break; proxy_pass http://mlnode1_8001; } location /ml2/ { proxy_redirect off; proxy_set_header X-Real-IP $remote_addr; proxy_set_header X-Forwarded-For $proxy_add_x_forwarded_for; proxy_set_header Host $http_host; proxy_max_temp_file_size 0; client_max_body_size 10m; client_body_buffer_size 128k; proxy_connect_timeout 90; proxy_send_timeout 90; proxy_read_timeout 90; proxy_buffer_size 4k; proxy_buffers 4 32k; proxy_busy_buffers_size 64k; proxy_temp_file_write_size 64k; rewrite ^/ml2(/.*)$ $1 break; proxy_pass http://mlnode2_8001; } location / { proxy_redirect off; proxy_set_header X-Real-IP $remote_addr; proxy_set_header X-Forwarded-For $proxy_add_x_forwarded_for; proxy_set_header Host $http_host; proxy_max_temp_file_size 0; client_max_body_size 10m; client_body_buffer_size 128k; proxy_connect_timeout 90; proxy_send_timeout 90; proxy_read_timeout 90; proxy_buffer_size 4k; proxy_buffers 4 32k; proxy_busy_buffers_size 64k; proxy_temp_file_write_size 64k; proxy_pass http://ml8001; } } ################################ 8002 ################################ server { listen 8002; location /ml0/ { proxy_redirect off; proxy_set_header X-Real-IP $remote_addr; proxy_set_header X-Forwarded-For $proxy_add_x_forwarded_for; proxy_set_header Host $http_host; proxy_max_temp_file_size 0; client_max_body_size 10m; client_body_buffer_size 128k; proxy_connect_timeout 90; proxy_send_timeout 90; proxy_read_timeout 90; proxy_buffer_size 4k; proxy_buffers 4 32k; proxy_busy_buffers_size 64k; proxy_temp_file_write_size 64k; rewrite ^/ml0(/.*)$ $1 break; proxy_pass http://mlnode0_8002; } location /ml1/ { proxy_redirect off; proxy_set_header X-Real-IP $remote_addr; proxy_set_header X-Forwarded-For $proxy_add_x_forwarded_for; proxy_set_header Host $http_host; proxy_max_temp_file_size 0; client_max_body_size 10m; client_body_buffer_size 128k; proxy_connect_timeout 90; proxy_send_timeout 90; proxy_read_timeout 90; proxy_buffer_size 4k; proxy_buffers 4 32k; proxy_busy_buffers_size 64k; proxy_temp_file_write_size 64k; rewrite ^/ml1(/.*)$ $1 break; proxy_pass http://mlnode1_8002; } location /ml2/ { proxy_redirect off; proxy_set_header X-Real-IP $remote_addr; proxy_set_header X-Forwarded-For $proxy_add_x_forwarded_for; proxy_set_header Host $http_host; proxy_max_temp_file_size 0; client_max_body_size 10m; client_body_buffer_size 128k; proxy_connect_timeout 90; proxy_send_timeout 90; proxy_read_timeout 90; proxy_buffer_size 4k; proxy_buffers 4 32k; proxy_busy_buffers_size 64k; proxy_temp_file_write_size 64k; rewrite ^/ml2(/.*)$ $1 break; proxy_pass http://mlnode2_8002; } location / { proxy_redirect off; proxy_set_header X-Real-IP $remote_addr; proxy_set_header X-Forwarded-For $proxy_add_x_forwarded_for; proxy_set_header Host $http_host; proxy_max_temp_file_size 0; client_max_body_size 10m; client_body_buffer_size 128k; proxy_connect_timeout 90; proxy_send_timeout 90; proxy_read_timeout 90; proxy_buffer_size 4k; proxy_buffers 4 32k; proxy_busy_buffers_size 64k; proxy_temp_file_write_size 64k; proxy_pass http://ml8002; } } } - Create a file called upstream-defs.conf and copy the code below to it. This file will be included in the nginx.conf file above.
upstream ml7997 { server marklogic-0.ml-service.default.svc.cluster.local:7997; server marklogic-1.ml-service.default.svc.cluster.local:7997; server marklogic-2.ml-service.default.svc.cluster.local:7997; } upstream ml8000 { least_conn; server marklogic-0.ml-service.default.svc.cluster.local:8000; server marklogic-1.ml-service.default.svc.cluster.local:8000; server marklogic-2.ml-service.default.svc.cluster.local:8000; } upstream ml8001 { least_conn; server marklogic-0.ml-service.default.svc.cluster.local:8001; server marklogic-1.ml-service.default.svc.cluster.local:8001; server marklogic-2.ml-service.default.svc.cluster.local:8001; } upstream ml8002 { least_conn; server marklogic-0.ml-service.default.svc.cluster.local:8002; server marklogic-1.ml-service.default.svc.cluster.local:8002; server marklogic-2.ml-service.default.svc.cluster.local:8002; } #################################################### # Upstream Mapping direct to specific node on 8000 # #################################################### upstream mlnode0_8000 { server marklogic-0.ml-service.default.svc.cluster.local:8000; } upstream mlnode1_8000 { server marklogic-1.ml-service.default.svc.cluster.local:8000; } upstream mlnode2_8000 { server marklogic-2.ml-service.default.svc.cluster.local:8000; } #################################################### # Upstream Mapping direct to specific node on 8001 # #################################################### upstream mlnode0_8001 { server marklogic-0.ml-service.default.svc.cluster.local:8001; } upstream mlnode1_8001 { server marklogic-1.ml-service.default.svc.cluster.local:8001; } upstream mlnode2_8001 { server marklogic-2.ml-service.default.svc.cluster.local:8001; } #################################################### # Upstream Mapping direct to specific node on 8002 # #################################################### upstream mlnode0_8002 { server marklogic-0.ml-service.default.svc.cluster.local:8002; } upstream mlnode1_8002 { server marklogic-1.ml-service.default.svc.cluster.local:8002; } upstream mlnode2_8002 { server marklogic-2.ml-service.default.svc.cluster.local:8002; } - Build the image and push it to your registry.
docker build -t <your registry/your image name>:<your image tag> .
docker push <your registry/your image name>:<your image tag>
Remember, if you exposed additional ports in your Dockerfile, PetSet/StatefulSet, and Service and those ports need to be publicly accessible, you’ll need to modify the NGINX configuration to support their routing. Also, if you increase or decrease the number of MarkLogic Pods being deployed, you’ll need to update the configuration as well so reflect this change. The NGINX configuration shown in this example expects 3 MarkLogic pods to be running.
Now, we’ll create specification for the NGINX Replication Controller.
Create a file called nginx-ingress.rc.yml and copy the code below into the file.
apiVersion: v1
kind: ReplicationController
metadata:
  name: nginx-ingress-rc
  labels:
    app: nginx-ingress
spec:
  replicas: 1
  selector:
    app: nginx-ingress
  template:
    metadata:
      labels:
        app: nginx-ingress
    spec:
      containers:
      - image: <your registry/your image name>:<your image tag>
        imagePullPolicy: Always
        name: nginx-ingress
        ports:
        - containerPort: 7997
          hostPort: 7997
        - containerPort: 7998
          hostPort: 7998
        - containerPort: 7999
          hostPort: 7999
        - containerPort: 8000
          hostPort: 8000
        - containerPort: 8001
          hostPort: 8001
        - containerPort: 8002
          hostPort: 8002
        # Uncomment the lines below to enable extensive logging and/or customization of
        # NGINX configuration with configmaps
        #args:
         #- -v=3
         #- -nginx-configmaps=default/nginx-config
      imagePullSecrets:
      - name: registry-secret
Let’s go through the various portions of the NGINX Replicaton Controller configuration.
- Lines 1 – 6
- kind – Specifies the type of resource being deployed
- metadata
- name – The name to use for our resource
- labels
- app – Label applied to the resource
- Lines 15 – 32
- image, imagePullPolicy, and name are all basically the same as the PetSet specification except for the actual image we’re going to pull. In this case, we want the <your registry/your image name>:<your image tag> NGINX image.
- ports – The ports that should be publicly exposed.
- Lines 38 – 39
- imagePullSecrets – Again, the same as our PetSet specification above.
Starting up the Cluster
The first thing to do is to make sure our Miikube VM is up and running.
minkube start --insecure-registry=<your registry IP>
You should see the following:
Starting localKubernetes cluster...
Kubectl is now configured to use the cluster.
Additionally, your VirtualBox manager should show the Minikube VM running.
Ok, now our minikube environment is up and running. If you want to see the configuration for the node, you can open the /Users/<username>/.minikube/machines/minikube/config.json file.
We need to deploy our resources in a specific order or you might get errors. The first item will be the Secret our services will use to authenticate to the private Docker registry when pulling images into the pod. In a terminal window, navigate to the folder where you stored your Kubernetes configuration files then type:
kubectl create -f registry-secret.yml
Next, deploy the network service
kubectl create -f ml-service.yml
Now, deploy the petset or stateful set, whichever you’re implementing.
kubectl create -f ml8-kub-<petset | statefulset>.yml
Lastly, we’ll deploy our NGINX pod for servicing requests to our MarkLogic nodes
kubectl create -f nginx-ingress.rc.yml
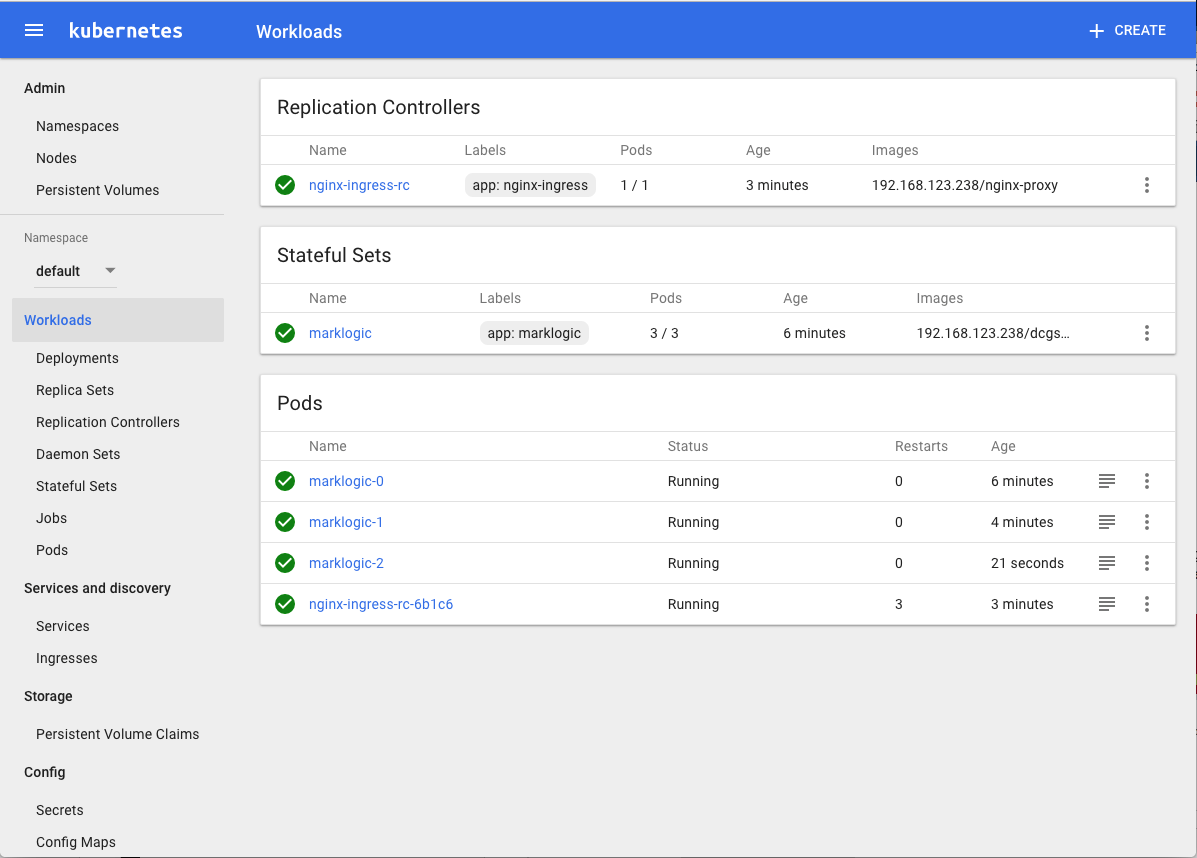
Let’s take a look at the Kubernetes dashboard to see what’s been deployed and the status of each. The command below should open a browser window and navigate to the Kubernetes Management Dashboard. From here you can deploy, manage, and inspect your various services/pods.
Minikube Dashboard
Error Messages
You may see the following error when viewing the dashboard or the logs.
SchedulerPredicates failed due to PersistentVolumeClaim is not bound: "ml-data-marklogic-0", which is unexpected.
This is expected as during the very first run of our petset | statefulset as the image has to be pulled in its entirety from the registry. After the initial pull, subsequent pulls will only need to retrieve the modified image layers. The initial image pull can take upwards of a minute or so. Also be advised that our NGINX configuration is set up to expect 3 MarkLogic nodes. If you deploy less than 3 you’ll get an error for this container.
Additionally, you can see that PersistentVolume claims have been established for each MarkLogic node. The volume claims map to /tmp/hostpath_pv/<unique ID> on the host (minikube). If you run:
minikube ssh
you’ll be connected to the minikube host environment. You can then list the contents of each MarkLogic node directory.
sudo ls -la /tmp/hostpath_pv/<unique id>
You can see which volume maps to which pod by clicking the Persistent Volumes link in the Admin section of the Kubernetes Dashboard and inspecting the persistent volume name.
If you want to see the output of each pod and the messages displayed during the pod’s initialization you can click the  to the right of each Pod. This will open up a separate browser tab and display the output for that pod.
Opening up MarkLogic Admin Pages
The NGINX load balancer is set to route page requests to each node using the “least conn” logic so going to the root URL will result in “random” hosts being returned. The NGINX load balancer will also allow you to navigate to a specific node in the cluster.
Open a web browser and go to http://<ip address of your kubernetes dashboard>:8001. You should hit one of the running MarkLogic nodes. To hit a specific node, enter http://<ip address of your kubernetes dashboard>:8001/[ml0 | ml1 | ml2].
Summary
So that’s it! You have successfully created and deployed a 3-node MarkLogic cluster with an NGINX load balancer using Kubernetes to deploy and manage it. Although this was a fairly long article, the majority of it was the scripts. Hopefully, this will demonstrate the capabilities available. While this may not be a “production grade” deployment, it does illustrate the basic concepts. There are a multitude of ways to perform this sort of deployment; this just happens to be one that worked for me.
Additional Resources
- Read this blog on Building a MarkLogic Docker Container
- Read this blog on Automating MarkLogic Docker Installs
- Read this blog on Creating an MLCP Docker container with pre-loaded data
- Read this blog on MarkLogic Docker Container on Windows
- View this webinar on Running Marklogic in Containers (Docker and Kubernetes)
Bill Miller
View all posts from Bill Miller on the Progress blog. Connect with us about all things application development and deployment, data integration and digital business.
Comments
Topics
- Application Development
- Mobility
- Digital Experience
- Company and Community
- Data Platform
- Secure File Transfer
- Infrastructure Management
Sitefinity Training and Certification Now Available.
Let our experts teach you how to use Sitefinity's best-in-class features to deliver compelling digital experiences.
Learn MoreMore From Progress


Latest Stories
in Your Inbox
Subscribe to get all the news, info and tutorials you need to build better business apps and sites